

|
|
It's all bryan's fault... |
Post Reply 
|
| Author | |
jarmumd 
RCRC Club Member 
Joined: 26 July 2010 Location: Harvest, AL Status: Offline Points: 274 |
 Post Options Post Options
") Thanks(0) Thanks(0)
 Quote Reply Quote Reply
 Topic: It's all bryan's fault... Topic: It's all bryan's fault...Posted: 01 October 2010 at 9:50am |
|
So Bryan (bkubisht), informed me of a 1991 22re out of a 2wd auto with 150k. I picked up the motor for a clean $100.
 Sitting beside it is my Craigslist motor that I paid $250 for, that is buggered due to running without thrust washers. First off I'm surprised at how complete the motor is, they pretty much pulled and cut or pinched off any thing that came off the block, but otherwise PS pump, exh manifold, intake manifold and injectors, even vacuum switching valves and such. Second it has a ton of corrosion for a 91. My 84 spent 10 years of it life on the coast of SC, and has no where near the corrosion of this motor. Hood was still on the truck, so not sure where it came from. So at this point I figure that even if it's a dud I can part it out, maybe rebuild parts and maybe break even on the cost of the motor. Drain the oil... Outside of a lot of sludge and some very very dirty oil, it had a full tank of oil. Pull the oil pan...  Seems that this motor hasn't been worked on, since I'm assuming that the sealant on the pan is factory. There are stamping on the connecting rods, but nothing on the crank... And the crank feels tight, havent broken out the dial indicator, but I'm feeling that everything is still tight on this motor. Note no timing chain pieces in oil pan!  So now to check on the valvetrain...  And outside of the sludge, timing rails intact, no obvious damage to valvetrain. And i pulled a plug and at least that #1 looked real good, no fouling or burning. So next thing on my list is to do a compression check before I pull the head (need a comp tester). I'm kinda thinking if the compression check is good, maybe not to even mess with pulling the head and just go straight to work on integrating it into my 4runner? Btw can I replace the timing chain cover / water pump without pulling the head? The water outlet has a chunk missing... So I think I have a good motor here... What would ya'll suggest I check / upgrade / maintenance while it's on my engine stand? |
|
 |
|
|
bkubisht
RCRC Club Visitor 
Joined: 27 June 2006 Location: Huntsville, Madison County Status: Offline Points: 556 |
Post Options
Thanks(0)
Quote Reply
Posted: 01 October 2010 at 3:01pm |
|
Wow, not often I see my name in front page news, I thought I'd pissed someone off! Did they crush the truck yet? I was thinking about going back for the Alpine 2-way pager, cat, and A/C hoses.
The truck had been in a mild collision prior to the redneck bumper setup, The corrosion was battery acid splashed around.
What I'd check for in your situation:
-Timing guides intact
-Excessive wear on cam or excessinve valve lash
-plastigauge the entire bottom end & check thrust clearance
-Check spark plugs for good pattern (none oily or different from the others)
-Leakdown test on each cylinder
-probably something else I haven't thought of yet
If it passes all those tests then just grab some intake & exhaust gaskets and run it! Lazer blocks don't wear out.
Edited by bkubisht - 01 October 2010 at 3:03pm |
|
|
3RZ swapped 1985 Toyota 4Runner
|
|
|
|
|
Toydawg
RCRC Club Visitor

Joined: 20 June 2006 Location: United States Status: Offline Points: 953 |
Post Options
Thanks(0)
Quote Reply
Posted: 01 October 2010 at 3:03pm |
|
I'm surprised you didn't find pieces of the plastic timing chain guides in the oilpan. The single row timing chain 22R/RE series engines in 4x4s are on borrowed time after about 100K; 2WDs often hold out another 50K or so. (I have a friend that put 300K on his 2WD before replacing the timing chain, but he drives like an old man...) It's a good sign there's no RTV 'goop' nor timing chain guide parts in the pan, but I would put on a new timing chain at the very least before trying to run it.
|
|
|
1984 Toyota pickup, locked 5.29s, dual cases, Longfields, 22R with low range cam and header.
|
|
|
|
|
bkubisht
RCRC Club Visitor
Joined: 27 June 2006 Location: Huntsville, Madison County Status: Offline Points: 556 |
Post Options
Thanks(0)
Quote Reply
Posted: 01 October 2010 at 3:05pm |
|
Oh, and tell me you grabbed the ECU and wiring harnesses! You could have a sweet EFI swap done for $100, since you have most everything else.
|
|
|
3RZ swapped 1985 Toyota 4Runner
|
|
|
|
|
bkubisht
RCRC Club Visitor
Joined: 27 June 2006 Location: Huntsville, Madison County Status: Offline Points: 556 |
Post Options
Thanks(0)
Quote Reply
Posted: 01 October 2010 at 4:23pm |
|
I just had another idea you could check. Take some of the oil and send it off to be analyzed for heavy metals, coolant, etc. It costs about $20 including postage, worth every penny for something like you have there.
|
|
|
3RZ swapped 1985 Toyota 4Runner
|
|
|
|
|
jarmumd
RCRC Club Member
Joined: 26 July 2010 Location: Harvest, AL Status: Offline Points: 274 |
Post Options
Thanks(0)
Quote Reply
Posted: 02 October 2010 at 3:37pm |
|
Thanks for the responses! I drained all the oil into a partially full oil container, so I'm not sure that I have enough for an analysis. In my ignorance, I just told them to pull the motor, so they cut the harness while getting it out, and no computer. But Bryan if I go MegaSquirt, I don't need that stuff anyways.
Haven't torn into the engine yet, but I'm thinking I should clean the outside of it as best I can now, and then it would be good insurance to just re-gasket the thing. Will let ya'll know how it goes when I start tearing into it |
|
|
|
|
bluetoy
RCRC Club Visitor

Joined: 17 February 2004 Location: Skyline, Jackson County Status: Offline Points: 2222 |
Post Options
Thanks(0)
Quote Reply
Posted: 03 October 2010 at 3:55am |
|
Looks like a good motor to me. Nice find.
Just curious though, why on earth would you want megasquirt injection on a 22re ?
|
|
|
TOYOTA FOUR WHEEL DRIVE................need I say more?
|
|
|
|
|
bkubisht
RCRC Club Visitor
Joined: 27 June 2006 Location: Huntsville, Madison County Status: Offline Points: 556 |
Post Options
Thanks(0)
Quote Reply
Posted: 03 October 2010 at 5:02am |
|
Wait, you got it for $100 and didn't have to remove it yourself?!? WOW! For that I probably would have bought it myself and put it on craigslist for $250 :0
|
|
|
3RZ swapped 1985 Toyota 4Runner
|
|
|
|
|
jarmumd
RCRC Club Member
Joined: 26 July 2010 Location: Harvest, AL Status: Offline Points: 274 |
Post Options
Thanks(0)
Quote Reply
Posted: 04 October 2010 at 5:06am |
For the most part because it would be unique and i would learn a lot. But the way I am going to do it, I would get rid of the AFM for a MAP system, and go to a Ford EDIS wasted spark system. Still have to understand how it all works with EGR and air injection and such. Bryan and I would be doing the ignition the same way - mine on an 22re, his on his hybrid 22/20r. That, and by the end of it, if I get it working good I will be very good at spotting and fixing engine problems without relying on counting flashes of the CEL. |
|
|
|
|
jarmumd
RCRC Club Member
Joined: 26 July 2010 Location: Harvest, AL Status: Offline Points: 274 |
Post Options
Thanks(0)
Quote Reply
Posted: 11 November 2010 at 6:27am |
|
So an update, I bought a leakdown tester from HF ($40), and in hindsight it would have been just as useful to simply put compressed air into the cylinder and listen for leaks... I say that b/c it seemed to have roughly the same leakage cold as my 84 22r does hot (actually the 84 is a little better).
But from what I could hear and feel, almost all the exh valves were leaking, #3 also had some leakage from the intake valve, and #2 had leakage past the rings. It could also be that they all leaked by the rings, but #2 didn't have exh valve leakage. So I opened up the motor (btw, will post picts tonight) Funny thing is, I don't see wear up and down the bore (like I do in my 84 motor), but I do see wear around the cylinder. My thinking is that the motor must have sat for a long time before running again, as you can see imprints of the oil ring in the bore. Some of the wear you can feel (can almost catch a fingernail). But you can still very clearly see the cross-hatching, which seems strange to me after 130k. What also is strange is that when I pulled the rocker-arm assembly off, two of the head bolts almost didn't come out. There was so much carbon in the rocker-arm assembly that the bolts couldn't get out! Never seen that before, and it wasn't the ones which connect the oil passages, which seems even weirder. So, I still need to plastigage the bearings, but I'm betting they will be good. Depending on that, I'm thinking of pulling the bottom end, re-honing the cylinders, at least lapping the valves, maybe take them to get re-cut? Then there are still a few more EFI parts I need to get, so I will be posting a wanted ad soon in case ya'll have some of what I need. Oh and Nick has convinced me to go Toyota EFI, which actually should be much simpler than MS, and a good deal cheaper. |
|
|
|
|
Guests
Guest 
|
Post Options
Thanks(0)
Quote Reply
Posted: 11 November 2010 at 6:51am |
Not all that unusual. It was very visible in my Jeep 4.0L when I tore it down at 175K.
|
|
|
|
|
bkubisht
RCRC Club Visitor
Joined: 27 June 2006 Location: Huntsville, Madison County Status: Offline Points: 556 |
Post Options
Thanks(0)
Quote Reply
Posted: 11 November 2010 at 2:21pm |
|
Yep, crosshatch isn't too unusual especially on the lazer blocks. Nick may have more insight, but I remember having carbon coked head bolts on an otherwise healthy 22R at 140k. Do the bores have much vertical scoring? How do the cam lobes look? Do the valve stems have nice circles on them indicating healthy spin from adjuster contact?
|
|
|
3RZ swapped 1985 Toyota 4Runner
|
|
|
|
|
jarmumd
RCRC Club Member
Joined: 26 July 2010 Location: Harvest, AL Status: Offline Points: 274 |
Post Options
Thanks(0)
Quote Reply
Posted: 11 November 2010 at 5:57pm |
|
Picts as promised...
Cylinder #1  Cylinders #2 and #3  Rocker pads  Valve stem (typical)  So looking at all the things you suggested Bryan, so far so good. Doesn't seem to be much scoring up and down the cylinder walls, but as the first picture shows, there's some corrosion and tactile pitting around the circumference. Rocker arm pads all look good, doesn't seem like the cam is worn, I don't think the engine was ever run without oil (may not have been changed often). Valves look like they are rotating, of the four I looked at, they all looked the same as the one above, and that looks to me like a valve that's rotating. oh... my parts bin from this motor...  and parts from various other purchases to this point... yea... need to get rid of this stuff...lol...  Edited by jarmumd - 11 November 2010 at 5:58pm |
|
|
|
|
jarmumd
RCRC Club Member
Joined: 26 July 2010 Location: Harvest, AL Status: Offline Points: 274 |
Post Options
Thanks(0)
Quote Reply
Posted: 27 June 2011 at 5:22am |
|
Update! So after a marathon weekend of wrenching, the 92 motor is in, and the 84 motor is out. I learned quite a bit in the process.... 92 2wd motor mounts are a direct swap for 84 4wd motor mounts.... the lower bracing/ribbing is not threaded for the auto, but must be threaded for the manual... and lots of other little things...
Still have a long way to go, routing wiring, installing efi tank and lines, determining O2 sensor location and welding bung on, correct combination of hoses and elbows to get a 92 intake to connect to the MAF sensor... Picts coming! |
|
|
|
|
grcthird
Senior Poster 
Joined: 07 September 2007 Location: Trussville Status: Offline Points: 578 |
Post Options
Thanks(0)
Quote Reply
Posted: 27 June 2011 at 7:43am |
|
My 85 has a 93ish engine in it, but the truck was fuel injected from the factory. It uses the stock harness and ecm, but some of the connectors have been spliced for the newer sensors ect. (and some stuff doesn't work right because of it)
The stock air tube from the mass air flow to the throttle body worked just fine. Although I have no idea what year the tube is from since a buddy gave it to me.
Why wouldn't you get a stock exhaust manifold off a fuel injected engine?
|
|
|
85 Toyota pickup with 85lbs of bondo, 33" TSLs, Spool, Warn winch, 63" chevy's, Ruf, cage and other preowned parts.
|
|
|
|
|
jarmumd
RCRC Club Member
Joined: 26 July 2010 Location: Harvest, AL Status: Offline Points: 274 |
Post Options
Thanks(0)
Quote Reply
Posted: 27 June 2011 at 7:50am |
|
So did you have the newer style intake (straight), or the older style (intake angled down)? mine is straight, I have both and older and a newer style air intake tube, but I don't think I have the intake manifold to intake tube that I need. I'll need to post picts of the situation.
As I understand it, this engine is expecting the O2 sensor in front of the Cat, not on the manifold - hence needing to put in a bung. Note: this is a 92 22re going into an 84 4runner, with a 95 harness and computer! lol |
|
|
|
|
grcthird
Senior Poster
Joined: 07 September 2007 Location: Trussville Status: Offline Points: 578 |
Post Options
Thanks(0)
Quote Reply
Posted: 28 June 2011 at 6:35am |
|
Awesome, I love frankenstein toyotas. I'll have to put a picture up of what I have on mine. It did have one of those flexible corregated generic tubes on it but it leaked air and ran like crap. |
|
|
85 Toyota pickup with 85lbs of bondo, 33" TSLs, Spool, Warn winch, 63" chevy's, Ruf, cage and other preowned parts.
|
|
|
|
|
alabamatoy
Admin Group

I dont work here anymore... Joined: 16 February 2004 Location: Signal Mountain Status: Offline Points: 9442 |
Post Options
Thanks(0)
Quote Reply
Posted: 29 June 2011 at 2:47am |
|
Are you going to do A/C on this motor? If not, can I get the idle-up Vaccum Servo Valve? Its a small device with two vacuum connections and a T-shaped electrical connector (2 contacts oriented at right angles like a "T") that mounts on the forward valve cover bolts.
I need one to idle-up the motor when the onboard air compressor kicks on. Since the 22RE doesnt have an idle control circuit, the air comp will bog the idle down.
|
|
|
"If you didnt buy your 1st gen 4Runner new, then YOU are a newbie!!"
BRC Life Member |
|
|
|
|
jarmumd
RCRC Club Member
Joined: 26 July 2010 Location: Harvest, AL Status: Offline Points: 274 |
Post Options
Thanks(0)
Quote Reply
Posted: 29 June 2011 at 8:17am |
|
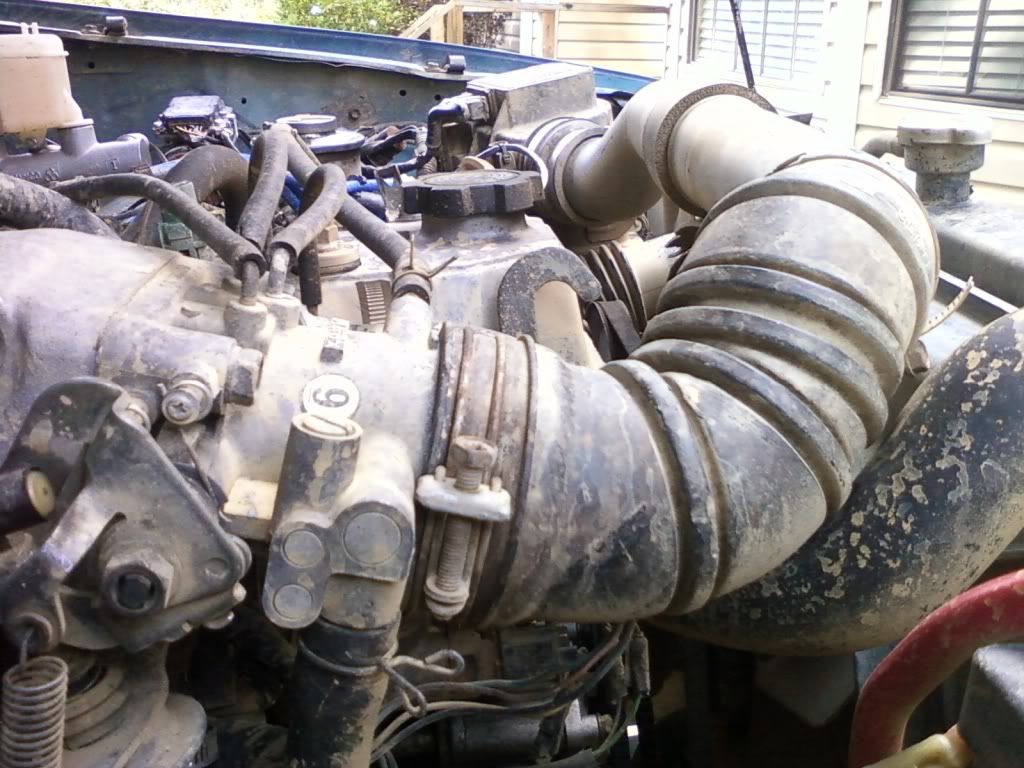
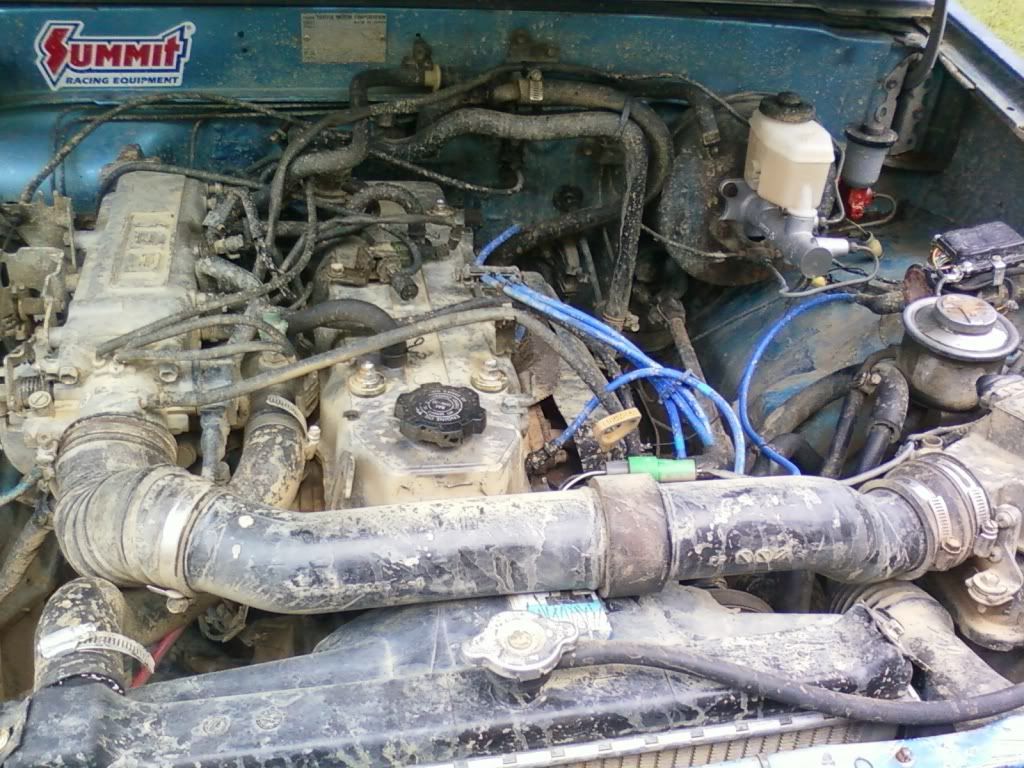
So I finally snapped some pictures of the "new" hotness...
 Now, strangely enough, all the intake hoses are actually pretty happy like this, however...  Yea no... the boot is for the older intake which should be pointed down... I think the newer intake boot might work... and a turbo boot might work... I'm looking into it... Here is the old motor, she was a great engine and will be (kinda) missed...  So getting back to the issues at hand, here is the issue with the intake and radiator hose, although I think it's an issue since I got a 87 radiator hose instead of an 85 (don't ask, I don't know why I did that...)  The 95 harness is a dream to work with so far, the engine, ignition, afm, O2 sensor are all on the same harness, and it comfortably went around the engine bay...  The boot into the firewall for the ecu is a little shorter than I would like, but I think it will work fine, but I will have to see what's behind it... I hate dash work...  Lots of details to go, and lots of potential issues since some stuff was hopes and dreams (like connecting a different knock sensor to the original wire without shielding...) So we will see... Oh and whereas most have their charcoal canister by the firewall, mine won't fit (it's lower than efi), but carb motors had a second one near the front of the engine bay for the carb bowl vent, so I think I'm going to move the fuel charcol canister into that location. Doc, I eventually want to do the same thing that you did (really I just need to build the bracket), but as it happens I have an extra valve cover from DRM with two of those VSV's, so have at it, you want me to bring them by the meeting next thurs? Edited by jarmumd - 29 June 2011 at 8:18am |
|
|
|
|
grcthird
Senior Poster
Joined: 07 September 2007 Location: Trussville Status: Offline Points: 578 |
Post Options
Thanks(0)
Quote Reply
Posted: 29 June 2011 at 9:35am |
|
Here's my setup, I had top hose issues as well but don't remember exactly what they were. I'll find the part number for you of the hose I used.
  |
|
|
85 Toyota pickup with 85lbs of bondo, 33" TSLs, Spool, Warn winch, 63" chevy's, Ruf, cage and other preowned parts.
|
|
|
|
|
grcthird
Senior Poster
Joined: 07 September 2007 Location: Trussville Status: Offline Points: 578 |
Post Options
Thanks(0)
Quote Reply
Posted: 29 June 2011 at 9:56am |
|
The hose part number I used is Dayco B70815, it's the same one listed for an 85 and 87 4runner. There is only one radiator option for the 87, but several for an 85. But since they all use the same top hose it should work, maybe I trimmed an inch or so off mine so it would fit right. I forget. Anyway maybe this helps. And no making fun of my ratrod car tag fan shroud fix. (At least that tag came off another toyota truck) |
|
|
85 Toyota pickup with 85lbs of bondo, 33" TSLs, Spool, Warn winch, 63" chevy's, Ruf, cage and other preowned parts.
|
|
|
|
|
alabamatoy
Admin Group
I dont work here anymore... Joined: 16 February 2004 Location: Signal Mountain Status: Offline Points: 9442 |
Post Options
Thanks(0)
Quote Reply
Posted: 29 June 2011 at 10:55am |
That would be outstanding. I will trade you for a 1/4" plate already drilled to accept the York compressor to get you started on the onboard air bracket. |
|
|
"If you didnt buy your 1st gen 4Runner new, then YOU are a newbie!!"
BRC Life Member |
|
|
|
|
jarmumd
RCRC Club Member
Joined: 26 July 2010 Location: Harvest, AL Status: Offline Points: 274 |
Post Options
Thanks(0)
Quote Reply
Posted: 30 June 2011 at 8:57am |
|
So I was running my fuel line last night (thanks Bryan!), and I'm not sure I have it right. Can someone post pictures of their fuel line routing? Specifically near the e-brake assembly. Thanks!
|
|
|
|
|
bkubisht
RCRC Club Visitor
Joined: 27 June 2006 Location: Huntsville, Madison County Status: Offline Points: 556 |
Post Options
Thanks(0)
Quote Reply
Posted: 30 June 2011 at 1:19pm |
|
Do carbureted pictures count?
Glad you're using it, it was a PITA to remove!!!!!
|
|
|
3RZ swapped 1985 Toyota 4Runner
|
|
|
|
|
Toydawg
RCRC Club Visitor
Joined: 20 June 2006 Location: United States Status: Offline Points: 953 |
Post Options
Thanks(0)
Quote Reply
Posted: 30 June 2011 at 1:25pm |
|
You can come look at how mine is routed if you want.
|
|
|
1984 Toyota pickup, locked 5.29s, dual cases, Longfields, 22R with low range cam and header.
|
|
|
|
|
jarmumd
RCRC Club Member
Joined: 26 July 2010 Location: Harvest, AL Status: Offline Points: 274 |
Post Options
Thanks(0)
Quote Reply
Posted: 06 July 2011 at 7:14am |
|
Updates:
Through some creative twisting of boots and plastic, my intake actually clears the hood with a small amount of room!  I had to twist the boot as shown - you can see how the arrows don't line up.  Ended up buying the $20 ish dollar hose from Toyota - looks like it's gonna fit perfectly  Installed the 3.0 throttle cable I got from Randy, just barely works. I had to flip the 22re throttle bracket, and back off the cable adjustment to after both nuts:   Made my own spark plug wire.  due to this style of coil:  And finally, I had to check Randy's 4runner to see how the gas line routed, I had it right, but the following pictures hopefully show my issue with the parking brake... Mine:  Randy's: (hard to see due to torsion bar mount)  Still have to mount the O2 sensor, but I actually think I have a really cool way to do it, and then pretty soon, all I'll have is wiring! |
|
|
|
|
jarmumd
RCRC Club Member
Joined: 26 July 2010 Location: Harvest, AL Status: Offline Points: 274 |
Post Options
Thanks(0)
Quote Reply
Posted: 11 July 2011 at 2:16pm |
|
So onto the electrical side of things...
I'm thinking of using the emissions relay from my 22r as my EFI relay. It previously powered the Carburated Mixture Heater (CMH). There are also two open fuse holders, which I'm going to use for my two EFI fuses as well.   I think that I'm going to tie into the ST1, IGN1, IGN2, AM1, and AM2 here:  Finally, they left me a hole in the mat to show me exactly where the harness goes!  Had to remove the a/c and fan to get to it!  Still need to figure out what I'm going to do for a starter relay, I'm thinking of using either a a/c relay I have lying around, or a horn relay. And how do I get the gauge cluster off? Looks like the speedo cable is still attached, how do I get to it? Edited by jarmumd - 11 July 2011 at 2:18pm |
|
|
|
|
alabamatoy
Admin Group
I dont work here anymore... Joined: 16 February 2004 Location: Signal Mountain Status: Offline Points: 9442 |
Post Options
Thanks(0)
Quote Reply
Posted: 12 July 2011 at 12:47am |
Its not so hard. IIRC, there are two screws at the top of the shroud and two along the lower edge, remove the shroud, then there another 4 screws that hold the actual cluster in place. Once its loose, you have to turn is slightly to reach behind it and squeeze the little lever that locks the speedo cable onto the back of the speedo. It will not come easy first time off and can require the application of some of those words my Mother told me never to use.
I think I have a SR5 cluster, the one with the tach built in, laying around somewhere. Want me to look for it? I also have a pillar guage pod for sale.
|
|
|
"If you didnt buy your 1st gen 4Runner new, then YOU are a newbie!!"
BRC Life Member |
|
|
|
|
jarmumd
RCRC Club Member
Joined: 26 July 2010 Location: Harvest, AL Status: Offline Points: 274 |
Post Options
Thanks(0)
Quote Reply
Posted: 12 July 2011 at 3:13am |
|
i'll think about the gauge pod, mines an SR5 (has tach), so no need to look for it. That's actually been a recent revelation, that the 92 motor only came with a low oil pressure switch, whereas my 22r came with the pressure transducer and a low pressure switch. Only recently have i realized which was which.
|
|
|
|
|
bkubisht
RCRC Club Visitor
Joined: 27 June 2006 Location: Huntsville, Madison County Status: Offline Points: 556 |
Post Options
Thanks(0)
Quote Reply
Posted: 24 July 2011 at 2:32am |
|
So is it running or what?!? My house is about the right distance for a test drive...
|
|
|
3RZ swapped 1985 Toyota 4Runner
|
|
|
|
|
jarmumd
RCRC Club Member
Joined: 26 July 2010 Location: Harvest, AL Status: Offline Points: 274 |
Post Options
Thanks(0)
Quote Reply
Posted: 24 July 2011 at 3:05pm |
|
Was on vacation last week, hopefully soon! I'll need to borrow someone's welder soon so that I can put the O2 sensor mount on.
|
|
|
|
|
bkubisht
RCRC Club Visitor
Joined: 27 June 2006 Location: Huntsville, Madison County Status: Offline Points: 556 |
Post Options
Thanks(0)
Quote Reply
Posted: 24 July 2011 at 4:24pm |
|
Have welder of course... C'mon over one evening.
|
|
|
3RZ swapped 1985 Toyota 4Runner
|
|
|
|
|
jarmumd
RCRC Club Member
Joined: 26 July 2010 Location: Harvest, AL Status: Offline Points: 274 |
Post Options
Thanks(0)
Quote Reply
Posted: 27 July 2011 at 4:41am |
|
So last night I did some temporary wiring to try and understand everything Nick has told me. Through trial and mostly error I was able to get the fuel pump to kick on. I'm still waiting on my ECU to come in, so I focused on making sure the fuel pump worked as it was suppose to, so I wired up parts of the EFI relay as well, and found out that I have a bad ground in my harness somewhere. Basically the AFM switch which grounds out the COR isn't grounding, and it isn't the AFM, I used the harness directly and it didn't work. But the diagnostic does work... So I'm not sure what's next, but I probably haven't connected up all the engine grounds yet, so I'll start there.
It'd be nice to get a new bulb for the EFI warning light, but for right now I just pulled the seatbelt caution light since mine is only a temporary at startup anyways, so I don't think I'll ever notice it. Hope to have picts of the wiring clusterfrak soon. I chose not to do it the easy way, but it's becoming more straightforward and obvious as I go. |
|
|
|
|
bluetoy
RCRC Club Visitor
Joined: 17 February 2004 Location: Skyline, Jackson County Status: Offline Points: 2222 |
Post Options
Thanks(0)
Quote Reply
Posted: 27 July 2011 at 5:02am |
I don't think the AFM sends a ground signal to the COR.
I don't have the diagram with me but from what I remember. The COR has 5 wires that should go as follows:
EFI relay- this is the power from the EFI relay that is the + signal for the fuel pump (white/red)
ground- this is just a chassis ground. (white/black)
Sta 1- this is a + signal from the ignition start position that trips the relay while the starter is turning over. (black/white)
AFM- this is a + signal from the AFM that keeps the relay on while the engine is running ( don't remember color)
Fuel pump- + signal to the fuel pump. ( blue-ish)
|
|
|
TOYOTA FOUR WHEEL DRIVE................need I say more?
|
|
|
|
|
jarmumd
RCRC Club Member
Joined: 26 July 2010 Location: Harvest, AL Status: Offline Points: 274 |
Post Options
Thanks(0)
Quote Reply
Posted: 27 July 2011 at 8:40am |
|
The diagram I've been looking at is that to keep the engine running, there is a normally closed switch in the afm, which opens when there is airflow. By opening the switch, you open a path to ground. So there are two grounds, one for the STA1 / GRN side, and one for the EFI / AFM side.
As I understand it, you have two separate circuits, one to activate the fuel pump when starting (since there isn't any airflow), and one to keep the fuel pump running when there is airflow. This second circuit has flow "in" from the EFI relay, but splits in two. One side goes through the contact side of the relay "out" to the fuel pump, the other side goes to the coil side of the relay and closes contact side when the AFM is grounded (taking the + from the EFI relay power and sending it to ground to power the coil). and my AFM wire is green (with yellow stripe?). Found a picture:  Edited by jarmumd - 27 July 2011 at 8:43am |
|
|
|
|
bluetoy
RCRC Club Visitor
Joined: 17 February 2004 Location: Skyline, Jackson County Status: Offline Points: 2222 |
Post Options
Thanks(0)
Quote Reply
Posted: 27 July 2011 at 9:39am |
|
You are right. I just assumed that since the STA is a + signal, then the one from the AFM was activating the same circuit with a + signal. I didn't realize there were two seperate circuits in the COR. That's a much better diagram than the generic hayne's manual I used . It didn't show the internal connections on the relay. I've not had any issues, so I didn't pursue it any further.
In that case, do you have the ground that bolts to the intake plenum attached?
|
|
|
TOYOTA FOUR WHEEL DRIVE................need I say more?
|
|
|
|
|
jarmumd
RCRC Club Member
Joined: 26 July 2010 Location: Harvest, AL Status: Offline Points: 274 |
Post Options
Thanks(0)
Quote Reply
Posted: 27 July 2011 at 10:41am |
|
I have the harness ground connecting to a bolt on the upper intake manifold.... You know... I don't have either of the lower (near engine mount) or upper (head to firewall) grounds installed.... That's probably my issue.. dangit... That's what you get working off the light of a headlamp....
|
|
|
|
|
jarmumd
RCRC Club Member
Joined: 26 July 2010 Location: Harvest, AL Status: Offline Points: 274 |
Post Options
Thanks(0)
Quote Reply
Posted: 15 August 2011 at 3:12pm |
|
WooT! Started first time! ( well first time after connecting up the fuel pump plug ) Would have taken it for a spin, but still have fluids to fill, electrical wires to route, put the dash together, oh and actually have a muffler - that's the big one, but it sure sounds good at idle, kinda like it has double the cylinders! Yea!! 22re happy dance (also doubles as a rain dance)
|
|
|
|
|
bluetoy
RCRC Club Visitor
Joined: 17 February 2004 Location: Skyline, Jackson County Status: Offline Points: 2222 |
Post Options
Thanks(0)
Quote Reply
Posted: 16 August 2011 at 2:07am |
|
Glad to hear you got it running. You'll enjoy the EFI.
|
|
|
TOYOTA FOUR WHEEL DRIVE................need I say more?
|
|
|
|
|
jarmumd
RCRC Club Member
Joined: 26 July 2010 Location: Harvest, AL Status: Offline Points: 274 |
Post Options
Thanks(0)
Quote Reply
Posted: 22 August 2011 at 3:45am |
|
So apparently you need gas to run the efi... my carb didn't need no gas to run! damn fancy pants computers!!!...
So yea, couldn't get it to stay running.... swapped AFMs, tested TPS, plugged and unplugged everything.... Got frustrated and moved towards finishing up stuff like the fuel tank (I had kept it loose in case I needed to drop it due to leaks), and noticed that it sounded completely empty (I had put some gas in it to test the fuel pump)... Needless to say some gas in the tank and she fired right up... And my old motor was a complete and total piece, because this engine has a ton more power... But it is throwing codes for the RPM signal and the Knock sensor... The RPM to the gauge cluster seems to work right, but if the engine stalls out (i.e. everything is still powered) the rpm signal doesn't go back to zero... but it doesn't just up at power on either... so I'm not sure that it's a ground... dunno yet.... |
|
|
|
|
Post Reply
|
|
 Tweet
Tweet
|
| Forum Jump | Forum Permissions You cannot post new topics in this forum You cannot reply to topics in this forum You cannot delete your posts in this forum You cannot edit your posts in this forum You cannot create polls in this forum You cannot vote in polls in this forum |


 Topic Options
 bluetoy wrote: